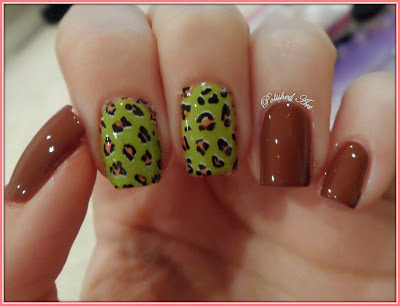
Showing posts with label animal print. Show all posts

Wednesday, 10 June 2015

Tiger Feeding

Any post that involves pictures of tigers is good right?

For Christmas, my lovely husband bought me a Big Cat Encounter at Wildlife Heritage Foundation in Kent.  WHF is a big cat sanctuary, but run a little differently to a normal zoo - it isn't open to the public other than by booking one of their experiences or on their annual open days.  The Big Cat Encounter included a couple of hours seeing all the cats with a keeper for tour guide, plus getting to feed some of the cats (through the fence...I still have all my limbs).

wildlife-heritage-foundation-puna-sumatran-tiger

This is Puna.  Whilst I obviously love all tigers equally, Puna is like the prettiest tiger ever.  Look at her little face!  She was a bit scared of John though bless her, although that didn't seem to be an issue when he was offering her chicken...

Anyway, nails.  I just did a simple tiger manicure (you can see my tutorial here) using OPI A Roll In The Hague, with some Barry M Matt White sponged on, and a very very old and very very thick black striper pen.

wildlife-heritage-foundation-tiger-nail-art

More tigers!

This is Puna's boyfriend (also a big fan of chicken).  When we visited, Puna had just had a contraceptive implant so that they can live together <3  They have been a breeding pair previously, but no more babies for the time being!

wildlife-heritage-foundation-sumatran-tiger-big-cat-encounter

I like that John looks like he's interviewing him...

I also added a little white nail, striped with China Glaze Call Of The Wild, for Narnia, the lovely white tiger below.

wildlife-heritage-foundation-tiger-nail-art

Narnia was the first tiger I fed and I was a little nervous, but she didn't eat my hand so it's all good.  It's crazy how much bigger they are up close though, even than they look in these pictures.

wildlife-heritage-foundation-narnia-white-tiger-big-cat-encounter

We also got to see the beautiful jaguar Athena, the pumas, the pride of white lions, a cheetah called Martin and lots of other tigers and little cats :)  And another massive lion who's moving soon so he can have some lady tigers for company.  We then spent the afternoon visiting Wildwood, which is like a zoo but for British animals.  Far less exotic, and mostly nocturnal.  Give me tigers any day...

Sunday, 11 August 2013

Black & White Challenge #6: Recreate a design

It's the final post for the Black & White Nail Art Challenge!  A big thank you to Yohana from Beauty-Shoes-Nails-Fun for hosting this challenge - do be sure to pop over and check her blog out :)


for the last day of the challenge, we had to recreate someone else's manicure.  AND we got to add a colour - woohoo!  I chose to recreate Nicole from Glitter Me This' faux fur manicure, adding a hot pink twist.  Here's what I ended up with!

Black-White-Nail-Art-Challenge-6-Recreate-favourite-manicure-animal-zebra-print

I used Barry M Matt White for my base and then a black 2-way nail art pen for the zebra stripes.  If you want to have a go at zebra print but don't know where to start, don't forget I have a tutorial!

Black-White-Nail-Art-Challenge-6-Recreate-favourite-manicure-animal-zebra-print

Then I added the pink stripe and highlights on some of the stripes with a striper brush (that sentence had far too many stripes...) and Orly Miss Conduct.

So, I'm done!  And only two days late, that's probably some sort of record for me...

Next week, I'll be starting a 'Then and Now' series of posts.  I'd like you, my lovely readers, to choose which of my 'then' manicures I should recreate, so please pop over and vote here (just 'like' a picture to cast a vote!).  Thank you, lovelies!


Saturday, 25 May 2013

The Most Fantabulous Water Decals In The World

As promised, here's the second set of water decals I have to show you from Born Pretty Store!


Oh my giddy aunt.  Straight on with nail art pictures!


Here's the first manicure I did!  As I had hoped, the white ones were see though!  Yay!  So I blobbed on some pretty colours and applies the decals over the top.  They are faaaabulous.

The decals are super easy to use - just cut them out, peel of the protective plastic, soak for 10-15 seconds and slide off the backing paper.  And when I say 'cut out', this is what I do...


Personally, I find it easier to cut them out really roughly and then just clean them up with acetone (as you would polish) afterwards.  You can of course cut the shape out right in the first place, but I'm terrible at judging the right size lol.

Next up, even more fantabulousness...


I don't think words can actually convey how much I love these.  Actual photos of leopards on my nails!  Aahhhhhhh!  Epic.

There are, obviously, enough decals for four full sets of nails. But of course you can just use them for accent nails, and make them go further :)


It's worth mentioning, all the decals were translucent, so I put them on over a coat of white to make sure the colour popped :)

So if you love these as much as I do, you can find them here.  They cost $3.99 (£2.65) with free shipping worldwide.  And don't forget, you can use my code LKL91 for 10% off any purchases.


Thursday, 18 April 2013

Matte Leopard Print

This is my 200th post - woohoo!

Unfortunately, I'm not exactly celebrating it in style.  I had a total creativity block and couldn't think of ANYTHING to do on my nails.  I wanted to do something to try out my Barry M nail art pens but...nothing...

So I decided to just go for some good old leopard print.

Matte-leopard-print-nails-with-Barry-M-nail-art-pen

I used OPI Skull and Glossbones with Barry M Grey for the spots.  I used the Barry M Nail Art Pen in Black to outline my spots.  I decided to mattify using Rimmel Pro Matte Top Coat.

If you'd like to have a go at nails like this, there's a step-by-step tutorial, which you can find in the Tutorials tab at the top of the page :)

I'm going to say something a little controversial here...  I didn't think the pen was great.  See where it looks like I tried to squeeze too many spots on to my middle finger?  That's because a huge blob of polish came out of the pen, so I rescued it by adding a grey spot in the middle!

That being said, I had a little go scribbling on my nails with the pink pen, and it was fab.  I think for leopard print I prefer thicker, messier lines, so actually having more control makes for worse leopard print...  That's just my opinion anyway.

Over the weekend I'm going to put together a comparison of the four different types of nail art pens that I have.  If there's any particular aspect of their use that you'd like me to compare, let me know in the comments :)

A couple of other things!  I remembered that I forgot that I was working through my list of new techniques!  Pop over to my Facebook page to vote for which technique you'd like to see my try out this week.  Jelly sandwich is winning at the moment, and I don't really want to do a jelly sandwich, so please vote and save me!  Or seal my fate.  Either one.

Also, for any Instagram users, I'm attempting to use that now.  I don't really get how it works, but my username is polishedart.  I'll add a button on the sidebar just as soon as I can work it out...  Does anyone know if I can set one of my pictures on there as my profile picture, because it doesn't seem to be an option? Also, if you have an Instagram account, let me know!  I'm not following anyone yet!

Thursday, 7 March 2013

Flip Flop #27: Recreate someone else's

Yeah so we'll just ignore the fact that this was a February challenge from here on..only one more left to post though!

Whilst I was MIA, I reached 30000 pageviews and 200 followers, so thank you all!

Due to my indecisive ways, I used a random number generator to select a manicure to recreate or day 27 of the challenge (yes, honestly), and I ended up selecting this manicure from Organic Neglect.  This was for Lizajane's day 25 (inspired by a tutorial manicure).  I do actually have OPI Designer de Better, which Lizajane used, but I decided to go for something a little more subtle and work-appropriate (if leopard print is ever work appropriate).

flip-flop-challenge-day-27-leopard-print-tips-china-glaze-on-safari-elephant-walk

I used two coats of China Glaze Elephant Walk, then added leopard print tips with a silver nail art pen (sorry, it doesn't show up very well!).  Speaking of elephants, we watched a documentary last night about a zoo and it showed an elephant giving birth, and oh my word!  That baby came out so quickly, I don't know how it even survived hitting the floor with that much force lol.

Tuesday, 19 February 2013

Flip Flop #16: Animal Print

The other choice for today was stripes, but as is I was going to choose that over animal stripes!

Now I had a long hard think about this.  I've done a lot of leopard print and zebra print manicures, I've had a go at tiger and poison dart frog.  So what to do this time...

Well, after mulling it over, coming up with some new ideas, I finally settled on....leopard print!

Yeah ok, so not exactly new and exciting. BUT it does have a little twist.  Flocking powder!

Flip-Flop-Challenge-Day-16-Animal-Print-fuzzy-leopards-flocking-powder-velvet-nails

I used Barry M Gold Foil, with OPI Warm and Fozzie for the spots.  Then I outlined my spots using a black nail art pen, and sprinkled on some flocking powder.  I think this is a pretty awesome idea, and how good would fuzzy zebra stripes look??  However, I think it needs more fuzz.  Maybe brown fuzzy spots as well?  I shall have to try it!  Maybe when I'm back in my flat though, I've got more than enough flocking powder on the hotel carpet.  And bed.  And chair.  It's their fault really for only having teeny little sheets of paper...

Anyway, I believe I'm currently three days behind.  I'll definitely catch up at the weekend if I don't before then (assuming I'm back in my flat by then!).

Thursday, 14 February 2013

Tiger Print Tutorial

This is a tutorial for tiger print nails, which I used in this animal print manicure.

To create this look, you'll need:


  • Orange polish (Max Factor Bright Orange)
  • White polish (Barry M Matt White)
  • Black nail art pen (or black polish and a striper brush)
  • Sponge (you only need a tiny bit - I just break bits off this make up sponge)
As always, have a go playing around with colours.  Neon skittle tiger print nails would look awesome...

Here's the step-by-step picture tutorial:


tiger-print-nail-art-step-by-step-picture-tutorial

1.  Prepare your nail as normal, and apply your orange polish.

2.  Taking a little bit of sponge and your white polish, pick an edge or corner of your nail and sponge away.  Try to vary where you do this on each nail.  To achieve an even look, you might find it helpful to do your first dab onto a piece of paper before your nail - this removes the excess polish so you don't end up with a big blob!  Also, start at the edge and work your way towards the middle of the nail, so that the white naturally fades.

3.  Using your striping brush, start at the side of you nail, and gently flick your brush across.  Don't try to hard to keep your lines straight, just let them curve with the natural curve of your nail.  You want your lines to come about 2/3 of the way across your nail.  Now do the same starting on the other side, a little further up.  Keep alternating until you've covered the length of your nail.

4.  Now on each side of your nail you have gaps between the stripes.  Go back in with your striper brush and shorter lines.  You can angle these slightly to avoid joining them up with the lines on the other side!

5. Time for a bit of clean up (if you've been as messy as me!).  Apply your favourite top coat, and you're good to go :)  Please remember to give your stripes time to dry before you top coat, so you don't end up smudging it all like I did!

Friday, 25 January 2013

Animal Print

Well thank goodness it's Friday.  Ugh.  I've had a migraine since Tuesday and I'm exhausted.  I could do with just sleeping until Monday morning, but I need to pick up my Seche Vite from the sorting office, so I'll have to surface at some point tomorrow.  I also need (read want) some new clothes.

As you'll know by now, I do love my animal print.  So today I have a selection of animal prints for you in this safari skittle!


The elephant skin was a bit of a fail...I tried using cling film for it.  In hindsight, it would've been better to have just painted it one shade of grey, then when it was almost dry pushed it so it all wrinkled up (as I'm oh so good at doing unintentionally).

Not too many polishes to list!  Hopefully...erm...Max Factor Bright Orange, Barry M Grey, Matt White and Black, China Glaze Kalahari Kiss, and OPI Warm and Fozzie and Skull and Glossbones.

You can see my tutorials for leopard and zebra print here and I have one on the way for the tiger print :)  The giraffe print is one of the water decals from Born Pretty Store that I reviewed here.

What are your plans for the weekend? :)

Thursday, 17 January 2013

Zebra Print Tutorial

I just received an email reminding me about an essay I was supposed to submit on Monday...whoops.  That's the rest of my night gone!

So here's one I prepared earlier!

This is a tutorial for zebra nails!  You can see examples where I've used this technique here and here (yes, that's orange zebra print, not tiger print...).  It's super easy to do and, like all animal print, it's faaaaabulous.

You will need:


  • Black polish
  • White polish
  • A striper brush
Of course, you can play around and use different colours :)  Just make sure you either use a darker polish for your stripes than your base, or one that's opaque in one coat.

zebra-print-step-by-step-nail-art-tutorial

1. Prepare your nail as usual, and apply your white polish.

2. Using your striper brush and black polish, paint a slightly curved V shape on your nail.  You can vary the size, position and orientation of this V on all your nails, then you don't have to worry about making every nail identical!

3. Starting from the other side of your nail, paint lines either side of your V.  Don't make these lines too straight - keeping the lines relaxed and a little bit curved is the key to this look :)

4.  Try making some of your lines fork into two, to give it a more zebra-y look.

5. Carry on with your lines until you've covered your whole nail.

6. Clean up any rogue polish and apply your favourite topcoat.  Ta da!

Tuesday, 15 January 2013

Animal Print Water Decals

Look at me posting two days in a row - I'm like a new woman!

Anyway, today I have another Born Pretty Store product to show you, and frankly, it's pretty awesome.  It's a sheet of 11 water decals.


To give you an idea of the size, here's a picture of one of the rectangles next to my naked (argh)  nail.  I genuinely struggled as to what to use for size comparison lol...I was going to use a penny but figured that wouldn't have been much use to all my international readers!  And I couldn't be bothered to dig out my ruler...


But anyway, as you can see, there's plenty to do a full manicure of one design, even if you've got really long nails.

These are simple to use - just cut out a piece about the size of your nail, soak it in water for 15 seconds, then slide it off and place it on your nail.  Don't worry about cutting it the the exact shape of your nail; I just used a rectangle slightly larger than my nail and used acetone to tidy it up, just like you would with nail polish.

These are great for creating an accent nail if you're in a hurry, so that's what I went for first!

born-pretty-store-nail-water-decals-zebra-animal-print

This is with OPI Flick Chick Cherry.

I was pleasantly surprised to find that the designs with white parts are actually clear!  How good is that?  Gives you so many more options of how to wear them.  And meant I could do this...

born-pretty-store-nail-water-decals-leopard-animal-print

Here I've used a decal on top of OPI Who The Shrek Are You? and Essie Very Structured.

born-pretty-store-nail-water-decals-snake-animal-print-gold-studs

I didn't even realise I'd chosen three animal print designs - whoops!  For this I used Essie Case Study, with a few gold studs that I got for Christmas, for the accent nails.

I honestly can't criticise these.  They're so easy to use, and the patterns are fun :)  And if you're using them on only a few nails, like I have, then you'll get loads of manicures out of this sheet.  A word to the wise...remember to take the plastic sheet off the top before you slide the decal off the backing paper (I am an idiot...).

You can take a look at this product here.  It costs $4.73 (about £2.50) and shipping is free worldwide.

Don't forget, if you do decide to buy these or any other products, you can get 10% off with the code LKL91.


Have you ever tried water decals?  Would you use something like this for manicures-in-a-hurry?

Saturday, 10 November 2012

Glittery Leopard

Good morning (er...afternoon) everyone :)  I hope you're all having a lovely weekend!

I used to do leopard print nails all the time - they were very much my go to nails when I couldn't think of anything else to do.  They're so quick and easy to do, but they look like they've taken a lot of effort!  Anyhoo, I realised I haven't done leopard print in a while, so I decided that's what I'd paint on my nails the other night.

I bought a few new glitter polishes the other day, so this had to be glittery of course!


I wanted to use my new Barry M Gold Glitter for the base.  I thought this was going to be a nice dense glitter like Red Glitter, but I layered it over Barry M Gold Foil just in case there were any little gaps.  Good job I did, because Gold Glitter is actually a lot more sparse than I was expecting.  Don't get me wrong, it's quite dense for a glitter, but you really wouldn't be able to build it up to be opaque on it's own.  I used 3 coats here, and I'm happy with it - I think it still achieved the look I was going for, especially in real life.

I then added dots of Jessica Ruffled Bottoms, and outlined the spots using a black nail art pen (that was going a bit mental and coming out so fast!  Hence the thick lines...).

So the next day (yesterday) I was thinking 'I've got challenge manicures I need to do...but I don't want to take off this glittery goodness!'.  But then, as I was buttoning up my coat, this happened.


Well the PVA glue base certainly did its job of making the glitter easier to remove!  Has anyone got any tips for making a manicure with a PVA base last a bit longer than a day or two?  Or will I just have to suck it up and remove it the old-fashioned way if I want to wear glitter for a few days?

Also, I'm hoping to get a few tutorials done this weekend.  Is a leopard print tutorial something people would be interested in, or is that something everyone's pretty happy with doing already?  If you've got any more suggestions of tutorials you'd like to see, just let me know in the comments (or if you're feeling shy you can email me at polishedart@hotmail.co.uk).

Untried: Barry M Gold Glitter

Thursday, 27 September 2012

31 Day Challenge - Day 13: Animal Print

A little while ago, we were at my boyfriend's auntie's house for a barbecue.  Their neighbours have all sorts of pets, and they took us round to see some of them.  They had a few poison dart frogs (which apparently are only poisonous in the wild because of the food they eat) and there was one yellow one, who was sooo cool.  So that little fella is my inspiration for today's animal print manicure for the 31 day challenge (I know it's two days late - sorry!).


I used a base of Rimmel Sunshine, and a black nail art pen for the detail.  My nail art pen was having one of those days where it just likes to gush out, so this all got a bit messy, and ended up being one of those designs that looks so much better in my head...

I'll do my best to get back up to date with this challenge, although..er...I haven't done my floral design for day 14 yet so you're definitely not getting that tomorrow.  Sorry!  I promise to be a better blogger next week!

Take a look at all the other animal print manicures that the girls have come up with:


Diana at Nails By Diana
Meredith at Perfectly Polished
Nicole at The Color Republic
Nicole at Nicole Gets Nailed
Shelby at Shelby's Swatches
Stephanie Louise at All Things Beautiful 
Liz and Lisa at Lozlosa 
Mari at Nailista 
Miss L at Beauty by Miss L 
Gini at Sassy Paints