Monday, 30 September 2013

Monthly Round Up: September

Good evening all :)  Over the past few months I've quite enjoyed reading posts like this on other people's blogs, so I thought I'd have a go at one myself!  Let me know what you think :)

So September was a pretty hectic month for me outside of blogging, which I knew it would be, so I lined up all these rather lovely guest posters for you.  They shared amazing manicures with you - there were a huge range of techniques, including freehand, DIY decals and the one-stroke technique, and they even wrote a few tutorials for you!  Thank you again to everyone who was kind enough to write a post for me (and if anyone else would like to write one in future, just get in touch!).


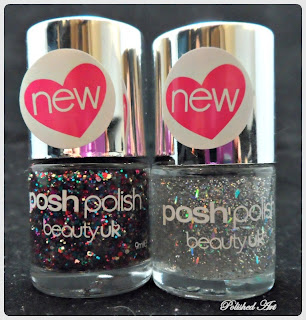
I did have time to write a few posts of my own this month though.  I had the opportunity to work with a couple of new brands - my fiance must have been so fed up with going to collect all the parcels I missed!  I reviewed these four beautiful glitters from Femme Fatale, and had the chance to review these stunning glitters from BeautyUK, which I'm sure you'll all agree are really quite unique for a high street brand.  Last but not least, I produced these fun animal manicures with stickers from Nailtopia!


The most viewed posts this month were:

October Sneak Peak: Next month I'm actually going to finally get round to doing the series of Then & Now posts that I've been claiming I'm going to do for months.  Every Monday I'll recreate a manicure from days gone by, selected by your fine selves.  Pop on over to the Facebook album to vote - just 'like' the nail art you'd like me to have another go at.  And you can vote for as many as you like!

Sunday, 29 September 2013

Femme Fatale: Noble Garden & Sea Pony

Hello all :)  I hope you've had a lovely weekend (just a shame it has to end!).  I'm feeling a little delicate today...  My parents, sister and friend all came to stay this weekend for us to go to the National Wedding Show, and obviously we had to have a tipple to celebrate and...well...if I never see a glass of wine again I think I'll be happy.  Had a great weekend though!

Anyhoo, as promised, today I'm showing you the other two polishes I was sent by Femme Fatale.  They are Noble Garden and Sea Pony.


First up, Noble Garden!

femme-fatale-noble-garden-swatch-polish

What a polish.  Super super densely packed with all different size green glitters, with a sprinkling of different coloured large hexes (think pinks and oranges) and a scattering of little glitters that flash bluey-purple.  This is all in a clear base, so you can layer it over any colour you like (bet it'd look amazing over black or white!).

femme-fatale-noble-garden-swatch

I used one coat of Noble Garden (yep, just one!) over Barry M Spring Green.  Application was great, with even coverage over the nail.  I reckon you could get this to full coverage without too many coats... (Should I have a go??).

Next up is Sea Pony.
femme-fatale-sea-pony-swatch

Sea Pony has red and pink hex glitters in all sizes right up to those awesome extra large ones you can see, plus some small black and yellow glitters, which I think add a really interesting twist, and I love the depth that the black seems to add.  All this is suspended in a purple jelly base, which is full of these lovely teeny little bronze glitters.  The purple base is warmer than it appears here, but you know...my camera hates purple (makes me sad).

femme-fatale-sea-pony-swatch

I used two coats of Sea Pony over Barry M Berry Ice Cream.  A little clumping occurred with the large hexes and I had to spread them around a bit to get a more even look, but I think this is fairly standard for glitters like this.  I finished this off with two coats of Seche Vite, just to make sure any bumps from those gorgeous massive glitters were smoothed out.

A really pretty polish with an unexpected mix of colours, and I just adore those large hexes - I think they look so good!  This one got the thumbs up from my other half :)

You can check out the full range of Femme Fatale polishes here.  They cost $10 (Australian dollars!), which is a little under £6.  Please note, the bottles I've shown here are just samples, the bottle you buy are 12ml!

Depending on where you are in the world, Femme Fatale polishes can also be purchased from:


International shipping is available direct from Femme Fatale for any British ladies (or anywhere else not served by these other suppliers!).  It is pricey though, as you'd expect, so it's worth considering group buys :)

If you have any other questions, just ask!  I hope you all enjoy the rest of your Sunday evening :)

Wednesday, 25 September 2013

KKCenterHk Ebalay Glitter Polish

Helloooo!  Get on my posting two days in a row, I'm a new woman!

Today I'm showing you a fab little glitter polish from KKCenterHk called EBALAY Charming Bronze Glitter Polish.


The glitter is primarily lovely bronze hexes, with a smattering of medium and small white hexes, and a few white bar glitters (skinny enough to be inoffensive!).


I layer it over Barry M Berry Ice Cream.  I think it's perfect for a glitter gradient like this :)  And although it looks beautifully soft here, it would be really striking over a darker colour.

Application was great, no issues whatsoever with the formula or brush.  I used my usual technique of two-ish coats here, and was happy with the amount of glitter and the distribution across my nail.

You can see this polish here.  It's $7.82 for a 15ml bottle (decent sized polishes - yay!), which is about a fiver in British money.  And, don't forget, you can get 10% off with the code polishedart.

I have a bit of a hectic weekend coming up, so I may do a disappearing act again until Sunday.  Tomorrow after work there's a retirement party for one of the ladies, then my parents (plus dog) are coming up Friday night, and I'm off to the National Wedding Show on Saturday!  If anyone knows of any dog-friendly pubs in the Maidstone area, do let me know!

Guest Post: Nail Jems

Hello ladies :)  This week's guest post comes from the lovely Jem of Nail Jems.  Jem has a beautiful bright and colourful blog, with equally beautiful nails to match (and some pretty handy reviews too!), so do pop over and check it out.

----------

Hi all, my name is Jem from the British/Australian nail blog Nail Jems!

I would like to thank Sam for allowing me to be a guest poster, she's a really talented nail artist and it's an honour to be deemed worthy of a spot amongst her own fantastic work! 

The nail design I bring you today is not so much about the design itself, but the technique I used to achieve it.

I'm a bit of a cheap skate and hate to over spend on anything, so I like to get creative with my funds first and foremost, and try and achieve great nail art with whatever I have laying around or can buy at the cheapest price!!! 

So to achieve today's mani, I did home made, hand drawn decals with coloured permanent marker pens, resulting in this funky multi-coloured chess board design!


To make home made decals, I start by painting a layer of clear polish onto a plastic sandwich bag and I let it dry thoroughly for several hours. It must be fully dry as if you try to draw on it, it will smudge, or it wont peel off the bag when you go to apply it to the nail.
Once the layer of clear varnish is dry you then draw your design right onto it.

As nails are so small it is difficult to draw out a precise grid with tiny boxes using just your ruler (believe me, I tried it and it was a mess!), so to do the chess board mani I printed out a grid pattern with small measurements using photoshop. I placed the part of the sandwich bag that had the clear polish over the grid, and then with the aid of a ruler for straight lines, traced the design in 4 different colours for each nail onto the layer of clear polish, and then coloured in alternate boxes. I let the ink dry and colour in the boxes another 2 times to get a nice solid colour.

When its done I peel the layer of topcoat from the bag using tweezers and cut it into nail sized pieces, I paint my base coat colour, or 'undies' if you prefer! (in this photo Sinful Colours 'Snow Me White') then I attach the decals to the nail with a layer of top coat left to dry for a couple of minutes so that it's tacky. I smooth the decals onto the nail with a cotton bud, trim the edges with cuticle scissors, and seal everything with another layer of topcoat.

I really love this technique and the coloured pens are so versatile, I've traced a beautiful fish scale mermaid pattern in one colour HERE (where you can also see what kind of pens I use), drawn free hand a multi- coloured henna pattern HERE, and even drawn directly onto the nail without making decals at all, like in my mani HERE.

I know a lot of girls that don't have great luck with nail stamping (it's certainly always been very hit and miss for me!) so this method can also be a great alternative as you can trace any pattern you want onto a decal to layer over your polish, and you can easily collect a nice selection of markers from thick to fine tips, in gold and silver and even colours like mine. Purchasing these pens has certainly been much cheaper than buying 20 different polishes hoping that they might be opaque enough for stamping only to discover that they aren't!

So I hope you like my marker pen technique and that it will inspire many experiments and great looking mani's, and thank you all for taking the time to read my post! If you would like to see more of my work be sure to visit my blog www.nailjems.blogspot.com.au where I definitely wouldn't say no to a couple of new followers ;)

One last thanks to the lovely Sam for this great opportunity... and I'm out! XXX

----------

What a great post!  I've used this decal technique for a couple of manicures (check out the leprechaun manicure I did for Sincerely Stephanie here), and can totally vouch for the tracing!  I normally use polish though, but using felt tips is a little bit genius!  So much easier to control and such a selection of colours!  And I can't quite get over how clean Jem's lines are and how uniform she's got the colours...I definitely need to give this a go!

Thank you again Jem for a fab guest post :)

Tuesday, 24 September 2013

Femme Fatale: Lime Thief and Bottle of Infinite Stars

Hello lovelies :)  My fiance went back to work today, so I should be posting a bit more regularly for a little while!  I've got so many photos ready, I just haven't had a chance to write many posts.  Too many weekends away and evenings out :)

I was recently send some polishes to review from Femme Fatale.  In addition to stocking loads of lusted-after indies, Femme Fatale also produce their own range of nail polishes, and that's what I'm showing you today!


First up I'm going to show you Lime Thief and Bottle of Infinite Stars.  Pop back later in the week to see what other polishes I was sent!

Lime Thief is my favourite of the polishes I was sent.  It has a green base (perhaps what you'd call a crelly??) and then is full of all different glitters, ranging from large matte green hexes to teeny tiny red glitters with a holo flash.  There's also teal in there and some matte red glitters too.  I really like the mix of shiny and matte glitters - makes it more interesting than other multicoloured glitters - and I LOVE the pop of the red glitters against the green.

Femme-Fatale-Cosmetics-Lime-Thief-indie-glitter-swatch
For these swatches I layered two coats of Lime Thief over Max Factor Cactus Green.  The glitter required a little bit of careful placement to ensure an even coverage, but nothing too tricky.  I used two coats of Seche Vite to make sure it was lovely and smooth with those large glitters.

Femme-Fatale-Cosmetics-Lime-Thief-indie-glitter-swatch

Next up, Bottle of Infinite Stars.  Even just the name is awesome.  This polish contains stars in a blue jelly base, and is jam-packed with various sizes of blue and slightly greenish hexes.  I squealed a bit when I unwrapped this - I do love me a shaped glitter.

Femme-Fatale-Cosmetics-bottle-of-infinite-stars-glitter-swatch

Here I used two coats over Barry M Blueberry Ice Cream.  I should say, China Glaze Man Hunt is like the perfect base for this, I just did it over a lighter base so you could see the glitters a little more clearly.  There is no fishing required here, I got tons of stars on the brush!  Almost too many!  And as you can see there's plenty of glitter in the base too.  My only complaint would be that stars from the first coat get almost totally obscured on the second coat.  I think I'd stick with just using one coat over Man Hunt in future :)

Femme-Fatale-Cosmetics-bottle-of-infinite-stars-glitter-swatch

 You can check out the full range of Femme Fatale polishes here.  They cost $10 (Australian dollars!), which is a little under £6.  Please note, the bottles I've shown here are just samples, the bottle you buy are 12ml!

Depending on where you are in the world, Femme Fatale polishes can also be purchased from:


International shipping is available direct from Femme Fatale for any British ladies (or anywhere else not served by these other suppliers!).  It is pricey though, as you'd expect, so it's worth considering group buys :)

Let me know if you'd like to see any of these polishes over other undies or commando, or if you have any questions!

Thursday, 19 September 2013

Guest Post: Beautylicious

Hello lovelies :)  Today's guest post comes from Roxy of Beautylicious.  Roxy has a whole array of beautiful, delicate nail art (and her header looks super tasty!) so do pop over and take a look!

----------

Hello ladies!

Roxy here, the girl behind the nails on Beautylicious. I have to be honest - I'm excited but also nervous to write here, on this lovely blog; this is my first international guest post and I'd like to thank Sam for the opportunity. Hope you enjoy my manicure and maybe browse through my newbie blog ^^


This design is actually a remake of an older one, I wanted to see how much I've evolved since I've started my blog (over six months ago). I've used the same nail polish Avon - Sea breeze, but I did the flowers on the accent nail with the one-stroke technique. You can check out my old design >here< and tell me what you think :)

Products used
So this is it! If you want to keep following my work, you can do so through the following ways:

Follow Me on Pinterest
Pinterest, Tumblr, Beautylish, Weheartit

Follow on Bloglovin

Or you can follow me through Facebook or GFC

Thank you for reading!
----------

I don't know about you, but I'm definitely thinking I should try out the one stroke technique!  Totally stunning manicure :)  Thank you again Roxy for guest posting for me!

Sunday, 15 September 2013

BeautyUK: Queen of Hearts and Gold Digger

Morning all :)  I hope you're all having a lovely Sunday so far!  I'm about to begin my Sunday with a yummy cooked breakfast!

On Wednesday I showed you two glitter polishes from the BeautyUK Posh Polish range.  Today I'm showing you the other two polishes I was sent to review :)  These are Queen of Hearts and Gold Digger.


First up is Queen of Hearts.  I thought from the bottle that this was going to be quite dark and not the sort of polish I'd like, but actually it's really pretty on the nail.  It's made up of medium matte black and shiny pink hexes, with black microglitter.  It's actually quite a delicate-looking polish.

beautyuk-queen-of-hearts-posh-polish-glitter-swatch-opi-skull-glosssbones

I used two coats of Queen of Hearts over OPI Skull & Glossbones.  Great coverage and great formula.  I think this would also be really pretty over a light pink.

Next up is Gold Digger.  This is primarily gold hexes, with a sprinkling of larger silver holo hexes.  The coverage of this was much better than I expected - I used two coats here.  You could probably get this to full coverage with a few more coats (or fake it with a shiny gold basecoat).

beautyuk-gold-digger-posh-polish-glitter-swatch-jessica-ruffled-bottoms

Here I'm showing it over Jessica Ruffled Bottoms.  I think this would benefit from a few more of the larger hexes, I ended up with only 1 or 2 on each nail and they weren't very noticeable.  Interestingly though, I bought this polish a year or so ago and my version is different - the glitter is a darker gold, and it has silver square glitters instead of the large hexes.  Don't know why they changed it, but I think the squares were a bit more interesting, but then the formula and coverage with this one are much better.  I could do a comparison if people would be interested in seeing that?

You can find these polishes here for £3.49 each, or they're also available in Superdrug :)


Saturday, 14 September 2013

Nailtopia Stickers

Hello lovelies :)

I'm currently sitting on the in-laws-to-be's sofa up in Liverpool (a little break between stuffing our faces for breakfast and stuffing our faces for tea) and thought I'd write a quick post!

I was recently send some products from Nailtopia to review, so that's what I'm showing you today :)  I have three sheets of very cute stickers to show you!


Each pack consists of one sheet of stickers.  The stickers are really thin, but they're almost a rubbery sort of material, so I didn't have any problems with them tearing or anything like that, and they happily laid flat on my nails.

First up, the tropical parrots!  These are so bright and lovely, that they just NEEDED a bright gradient to go with them.  I've run out of acetone though, so apologies for poor clean up!  This sheet has a lovely mixture of sizes, colours and parrots facing different ways.  You could do some cute nails with parrots sitting on branches and things :)


For the gradient, I sponged Max Factor Bright Orange over Rimmel Sunshine.

Next up, safari animals!  I do love an excuse to do animal print nails...  These stickers are all white (also available in black), and there are lions, giraffes, elephants, rhinos, kangaroos and some of those like deer-type things that you're not actually interested in seeing when you go to the zoo.  It didn't occur to me until I started sticking the stickers on though that white stickers don't show up on white polish...d'oh.


If you want to see the polishes I used, or tutorials for any of the nails, check out this post.

Lastly, silver glittery stars!  These are similar to the pink ones I reviewed from Born Pretty Store a few weeks ago, but thinner with that rubbery feel.  I did waste a few of these though as I was trying to peel them off the sheet, because they're so thin some of them creased up.  Otherwise they were easy to use though.


I used China Glaze Man Hunt and Barry M Blue Glitter for my super-sparkly base, with plenty of Seche Vite on top to make it all shiny.

All in all, I found these really easy to use. They were sticky enough that they didn't move once you'd put them on, but you could still peel them off without tearing them if you needed to reposition.  They're also thin and flexible enough that they don't stick up from your nail.  

You can take a look at these stickers on the following links: Tropical Parrots, Safari Animals and Shining Stars.  Each pack costs £2.99 and delivery was super quick!

Friday, 13 September 2013

Guest Post: Glitterfists

Friday the 13th.  Unlucky for some...  But not for me, because I have this wonderful guest post from Melissa at Glitterfists to share with you!  Melissa has an incredible indie collection, and here blog is full of beautiful swatches, so do check it out!

----------

Hello everyone! Sam was ever so kind to allow me to do a guest post on her blog and I was definitely honored when she said yes! Sam’s nail art is beautifully executed and she’s someone I look up to for inspiration when attempting to do nail art (even though I’m terrible at it!). So I just want to say thank you, Sam. I wanted to create something simple, yet fun and include some nail art as well. So I hope you all like my look!

For this look I used 3 polishes. I used Enchanted Polish July 2013, Sally Hansen Salon Perfect Hi Ho Silver and OPI Black Onyx. I’ll be honest and let you all know that this is my second attempt ever at nail art, so I wanted to do something simple yet challenging (for me, at least!). So, I chose to do cheetah print.


I first applied 2 coats of EP July 2013 on each nail. Then on my ring finger I took the smallest dotting tool I had, if you don’t have one a tooth pick or bobby pin will work great, and took SH Hi Ho Silver and drew little wobbly circles and triangles. I let those dry just a little bit then took OPI’s Black Onyx with a slightly bigger dotting tool and drew C’s around those wobbly shapes to create the cheetah “look”. I then went back to my smallest dotting tool and put in some extra black dots. I added a top coat and wa-lah, you’re finished!


I think this is a really sleek look that you could wear to work or to school without it looking too crazy and its definitely something beginners could do! I hope you all enjoyed as much as I did. Again, thanks Sam. You’re a doll.

----------

I totally love this manicure!  I'm so pleased Melissa decided to have a go at some nail art, and it turned out great!  And how stunning is that shimmer??

Thank you again for guest posting for me Melissa (and for your very kind words - you're too sweet!).

Wednesday, 11 September 2013

BeautyUK: Intergalactic and Twinkle Twinkle

Hello lovelies :)

I spent all night last night painting my nails (and er...drinking a bottle of wine) so I should hopefully have lots of posts coming up for you soon!

Today I'm showing you some glitter polishes I was sent from BeautyUK.  BeaultyUK is a British brand that produce colourful and affordable cosmetics.  You may have seen them in your local Superdrug :)

The polishes I was sent for review were glitters from the Posh Polish collection.  Today I'm showing you Intergalactic and Twinkle Twinkle, and you'll have to pop back later this week to see what else I was sent!

Beauty-UK-Intergalactic-Twinkle-Twinkle

Rather than saving the best until last, I've decided to start with my favourite!  Intergalactic is a multicoloured glitter, made up of both square and hex glitters.

BeautyUK-posh-polish-intergalactic-swatch-review-glitter-gradient

Intergalactic contains large hexes in gold and red, large squares in purple, green and red, medium hexes in blue, red, green and gold, as well as teeny little purple glitters.  It's pretty hard not to love a multicoloured glitter, and this is certainly no exception.  I love the little twist having some square glitters in it (and it also means you can totally justify buying it if you already own something like Technic Carnival).

Application was great - I used my normal two coat method here for this glitter gradient over OPI Skull and Glossbones.  The consistency was good, and the glitter's really dense.  Happy nail painter here.

Next up is Twinkle Twinkle.  From the bottle this looked like it was just going to be silver bar glitter, but I was totally wrong.

beautyuk-posh-polish-twinkle-twinkle-swatch-review-glitter

It's actually primarily silver holographic microshimmer, with a sprinkling of silver holo bar glitters.  Again, great consistency and glitter payoff.  I used two coats here - one was pretty enough for the microshimmer, but two gave a nice amount of bars I thought - over Barry M Blueberry Ice Cream.

Overall, I'm really pleased with these polishes - the quality is great and I think they're a bit different from what most high street brands offer.  It's nice to see brands coming up with new ideas rather than just recreating what the bigger brands have done!

BeautyUK Posh Polishes retail for £3.49 and you can check out the whole collection here.  They're also available in Superdrug, so you can pop in for an impulse buy as well!

Saturday, 7 September 2013

Guest Post: Life in Lacquer

Hello all :)  Today's guest post comes from Jade at Life In Lacquer.  Jade has some absolutely stunning stamped manicures that you NEED to check out, so pop on over and have a look!

----------

Hi everyone! I’m Jade popping over from Life in Lacquer. I am very excited to be guest blogging for you today at Polished Art!

I am a very big fan of Sam’s work and I am lucky to be able to show you all some of mine!

So after taking about 3 hours to decide what to do I have come up with this beaut!


For some reason I hardly ever use greens. But I do really like green… Strange!

For this I used a fan brush to drag a different colour from each side of the feature nails. I have never done this before but I think it looks really nice so I expect to be doing it again!

Its one of those brushes you get in the brush kits and just gets put to one side. But not anymore LOL.

Products used:
OPI Stranger Tides
OPI Don’t Mess With OPI
China Glaze Jolly Holly
Cheeky Jumbo Plate Viva Mexico
Konad Special Polish in White
Fan Brush
Poshe Top coat


I hope you enjoyed reading this and seeing my work! Hopefully I'll be allowed to pop back again soon
J
Life In Lacquer x

----------

I love the effect Jade achieved with the fan brush - it looks like fabric!  I may have to give the technique another go after my failed attempt a few months back...  And OPI Stranger Tides is one of my all time favourite polishes!

Thank you again Jade for your post!


Wednesday, 4 September 2013

Born Pretty Store Studs

Hello everyone!  Sorry I've been so quiet recently, just don't seem to be able to find any time to blog (good job I have all these lovely guest posters helping out!).

I had a...erm...interesting weekend.  We went down to Eastbourne on Saturday, stayed in a hotel with a jacuzzi bath and snazzy shower, went out for some tapas, yum yum yum!  My eye was hurting a little though, but I just wore my contact lenses anyway, because that's how I roll.  Sunday morning my eyelid was like half the size of my face (well...near enough) and my eye was sooo sore.  We drove down to Brighton, whilst I hid from the sun behind sunglasses.  Long story short, I have an ulcer on my cornea and had to go to eye hospital.  Boo :(  And now I'm not allowed to wear my contact lenses for a month...hmph.

Anyhoo, my fiance suggested I do some eye ulcer nails.  That's not what I've got to show you today though, you'll be pleased to hear!  I have some rather lovely neon studs from Born Pretty Store.  BPS has a huge selection on nail art products, as well stationery, accessories and other bits.


The studs are round and 2mm.  They come in a little packet of approximately 200.  It isn't quite as ideal as a pot I don't think, but the packet is at least resealable.


I used Barry M Grey for my base colour, then added tips with Max Factor Cactus Green and Disco Pink, then added large dots of Disco Pink on my accent nails and added studs on top.

The studs were as easy to use as any other studs I've tried, and didn't stick up from the nail too much.  Colour-wise, I thought they were really pretty, although I would say they were more pastel than neon.  Although, I should add, the colour on the website is accurate.

You can see these studs here, costing only £1.91 per pack (this is #6 I've shown you).  As always, if you decide to make a purchase you can use the code LKL91 for 10% off, and shipping is free worldwide.


Time for me to put some more eye drops in...

Sunday, 1 September 2013

Guest Post: Becacine

Let's kick off the month with another guest post!  Today we have the eponymous Becacine.  If you love holo polishes, you NEED to check out her swatches (you will weep with jealousy).

----------

The lovely and uber talented UK nail blogger, Sam, is sharing one of my posts with her community. Yay Black heart (cards) Take a look at her witty blog, Polished Art and join her site for fantastic nails and tutorials. You know you want to ☼

My contribution to *cough*cough* my rough interpretation of nail art involves Zoya Jelly Professional Lacquer in 3 shades of supremely buildable colors that would do wonders in the hands of just that - a professional. Funny thing - I don't do nail art!

Initially my intent was to just wear these colors alone so I did a skittle manicure to test the colors. After 3 coats, it still didn't feel right because they are so sheer and my nails were getting dangerously thick so I decided to try some random nail art "blobs" instead. Not a pretty word but the manicure turned out to be quite lovely at a distance. I am showing macro shots so you can see the different colors but the effect was much prettier IRL. I received many compliments because no one looks at another person's nails in macro mode!


Here were the steps:

Zoya Paloma, a sheer deep fuchsia-berry as an overall base color followed by Zoya Katherine, a sheer, dark, red-toned aubergine/oxblood with Zoya Frida, a sheer, dark, warm-toned teal blue randomly blobbed about. The always puurrrfect Hong Kong Girl top coat made them shine like glass. The manicure lasted a good 4 days without any tip wear.


The colors are actually gorgeous and would be perfect for jelly sandwiches. This was a fun experiment but as most of my readers know, I like my thin nails and tend to get frustrated by the amount of build up required for a novice at nail art. Don't let that dissuade you. 


A big thank you to Sam. I will be watching and learning from you, my dear ☼

----------

Well I for one think Becacine's "blobs" are stunning!  I seriously need to get myself some jellies...  I wasn't keen on the idea of them at first because I cannot stand VNL, but looking at the gorgeous manicures you can create using them (like this!) I think I need to have a change of heart!  I'm also (and I'm aware of how random this is going to sound) a little jealous of that perfect little glint she's got on her nails in the second picture.

A huge thank you again to Becacine, and don't forget to go check out her blog!