Friday 31 May 2013

Untried Challenge Day 9: Cheapest

There's quite a few of my untried polishes that were only 99p or £1, so I had a few to choose from for this manicure.

untried-challenge-day-9-cheapest-sinful-colors-see-you-soon-w7-mosaic-half-moons

My cheap polish here is Sinful Colors See You Soon (picked up from Poundland).  I teamed it up with W7 Mosaic.  I thought the colours matched a little better in the bottle than they did on the nail - oh well!  Both very pretty polishes anyway :)

Don't forget to catch up with all the other ladies!

Jonochi at Just Add Polish
Masha at Lost In Lacquer
Raine at Lacquer Lily
Amy at Fancy Side
Lizajane at Organic Neglect
Blueberry Pie at Blueberry Nails
Kristina at Lacquer Fetish
Missy at Gnarly Gnails
Uni at Acetone FIles
Erica at Coat of Mani Colors 

Wednesday 29 May 2013

Rainbow Foil

Evening everyone!

Why oh why is it still not Friday?  Or, better yet, Tuesday, when I have 10 days off work, woohoo!  Going to pop down to Swansea for a few days to hopefully book our wedding venue and my Mum's organised an engagement party.  And then on Sunday we fly to Portugal :)

Anyhoo, today I have some nail foil from KKCenterHK to share with you.

Back in the day, my Mum and I used to use Special FX foils, so I was quite excited to try these ones out!


The foil comes in a little storage pot, which is fab for keeping it in good condition!  I have some foils that I bought from ebay a couple of years ago, and they just came in an envelope, so there's bit patches that can't be used because they're creased and crumpled.  None of those problems here!


The foils are super easy to use.  Apply the glue in a thin, even layer.  When the glue goes clear, it's ready (it'll still be sticky, so don't touch it!).  Press the foil down on top.  Give it a good rub and make sure you get into all the corners.  Remove the foil and ta da!  Pretty rainbow gradient nails without all the sponging :)  And with a bonus bit of holographic thrown in.

It's a good idea to use a layer of polish underneath, just in case you get any small gaps in your foil.

And here's this foil used for a full manicure:

KKCenterHK-holographic-rainbow-nail-foil

Top coat is a must to seal the foil, otherwise your manicure really won't last.  Special FX used to sell a Sealer, because normal topcoats would cause the foil to crinkle.  I used one coat of Seche Vite here, and I don't think the crinkling is noticeable.

This foil (product NNAIL-E04) is available to buy here. It costs $7.69 (£5.09) for the foil, or $12 (£7.94) for a set of the foil plus the glue.  Please note, this isn't just nail glue!  You won't have much luck if you try to use that!

Don't forget, if you decide to make a purchase (of anything) from KKCenterHK, you can use the code polishedart for 10% off.


Tuesday 28 May 2013

Untried Challenge Day 8: Glitter

Hello lovely ladies!

I hope you all had a lovely weekend (extra lovely if you're in the UK with the bank holiday!).  I went down to St Ives for the weekend to meet up with my fiance's family, which was lovely :) I  also managed to sunburn the bottom of my legs whilst wearing turned up jeans, despite being freezing.  Slightly concerned about what's going to happen to me when I go to Portugal in a couple of weeks...I'll come back a beetroot.

Anyhoo, here's a reminder of the challenge prompts for the Untried Challenge:


So far I've been going in order, and I've got up to 'oldest'.  I'm now going out of order though (although my newest polishes - some rather lovely Illamasquas - are sitting poised and ready for the 'newest' challenge).

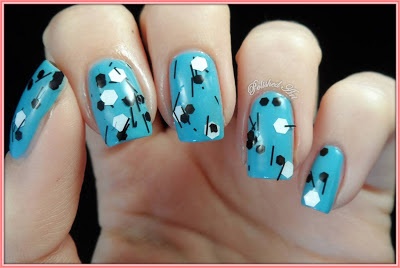
Today I'm jumping ahead to 'glitter'.  I'd wanted a black and white matte glitter (such an oxymoron...) for aaages, but I didn't really want to pay indie prices and not really know what quality of polish I was going to get.  So, when this polish was released, I HAD TO HAVE IT.  I ordered it immediately, then swooned at it when it arrived...then put it in my storage box and never used it.

Untried-Challenge-day-8-glitter-OPI-Can't-Find-My-Czechbook-Euro-Centrale-China-Glaze-Whirled-Away-Cirque-du-Soleil

It is, of course, China Glaze Whirled Away.  Not quite as elusive as It's A Trap-eze, but this still sold out in a lot of places pretty quickly!  I was seriously impressed with that whole Cirque du Soleil collection.

The white glitters required a bit of fishing, which is most most reviews have said.  A little bit of placement was required to get an even coverage, but it certainly wasn't the most difficult polish to apply.  I've used two coats here over OPI Can't Find My Czechbook from the Euro Centrale collection.

The other ladies, whose laptops didn't decide to give up on them, are now up to day 13.  Take a little look-see what they've been up to:

Jonochi at Just Add Polish
Masha at Lost In Lacquer
Raine at Lacquer Lily
Amy at Fancy Side
Lizajane at Organic Neglect
Blueberry Pie at Blueberry Nails
Kristina at Lacquer Fetish
Missy at Gnarly Gnails
Uni at Acetone FIles
Erica at Coat of Mani Colors 

Saturday 25 May 2013

The Most Fantabulous Water Decals In The World

As promised, here's the second set of water decals I have to show you from Born Pretty Store!


Oh my giddy aunt.  Straight on with nail art pictures!


Here's the first manicure I did!  As I had hoped, the white ones were see though!  Yay!  So I blobbed on some pretty colours and applies the decals over the top.  They are faaaabulous.

The decals are super easy to use - just cut them out, peel of the protective plastic, soak for 10-15 seconds and slide off the backing paper.  And when I say 'cut out', this is what I do...


Personally, I find it easier to cut them out really roughly and then just clean them up with acetone (as you would polish) afterwards.  You can of course cut the shape out right in the first place, but I'm terrible at judging the right size lol.

Next up, even more fantabulousness...


I don't think words can actually convey how much I love these.  Actual photos of leopards on my nails!  Aahhhhhhh!  Epic.

There are, obviously, enough decals for four full sets of nails. But of course you can just use them for accent nails, and make them go further :)


It's worth mentioning, all the decals were translucent, so I put them on over a coat of white to make sure the colour popped :)

So if you love these as much as I do, you can find them here.  They cost $3.99 (£2.65) with free shipping worldwide.  And don't forget, you can use my code LKL91 for 10% off any purchases.


Thursday 23 May 2013

Untried Challenge Day 7: Oldest

Going for a stab in the dark here...I think this is my oldest polish: Max Factor Ruby Fruit.  I'm assuming this because, back in the day before I was nail polish addicted, I loved Max Factor make up.  Some things never change though, so back then I also didn't like paying lits of money for things.  So I used to buy make up twice a year when they had those offers on in Boots with the free bag of goodies when you spent £15.  And I'm assuming this is a polish I got in one of those, because it's really not a colour I'd buy (unless I was drunk and/or caught up in the nail-polish-buying moment, in which case anything goes).

So anyhoo, here it is!  My oldest untried.

Untried-Challenge-Day-7-Oldest-untried-Max-Factor-Ruby-Fruit

There's a reason I've left Ruby Fruit unused for this long - it's ugly.  It was actually really pretty on the first coat, it was more of a fuschia colour.  But far too thin and streaky to wear as one coat, so you have to build it up to this rubbish colour.  I also decided to change the rules of this challenge, and I decided that black and white polishes are also allowed.  So I added some Barry M Black tips and dotted with OPI OY-Another Polish Joke from the Euro Centrale collection.

I was really impressed with the OPI actually.  In the bottle I though it was going to be a bit of a rubbish translucent gold-y sort of colour, because it looks similar to another brand I have which is a bit poor on the nail.  I was fully ready to dot over my dots several times to get an opaque colour, but it only took one go!  It's packed full of shimmer, very pretty indeed.

Don't forget to take a look at how all the other ladies in the challenge are getting on!


Jonochi at Just Add Polish
Masha at Lost In Lacquer
Raine at Lacquer Lily
Amy at Fancy Side
Lizajane at Organic Neglect
Blueberry Pie at Blueberry Nails
Kristina at Lacquer Fetish
Missy at Gnarly Gnails
Uni at Acetone FIles
Erica at Coat of Mani Colors 

Wednesday 22 May 2013

A Number of Nautical Nails

That was a poor attempt at alliteration, I apologise.

Anyhoo, my lovely sailor fiance is getting home today (YAY!!!) so what better time to show you these nautical manicures?

I was sent this sheet of water decals from Born Pretty Store.  There's like...I don't know, some ridiculous number of images on there.


They're set out into four sets of nails, but they are all individual decals.  And the nails on the sheet are massive as well.  So these will last you a fair while!  I so want to do a Peter Pan manicure with one of those little ships, but I just can't think how to do it...

There are about 4 or 5 of each design, and there's different sizes as well, which gives you lots of options for different nail art.

They're all nautical themed, but there's lots of different variations on the theme, so here are some of the looks I came up with.

Review-Born-Pretty-Store-nautical-nail-water-decals-vintage-Essie-China-Glaze

Here I used Essie Case Study, with China Glaze Desert Sun and Kalahari Kiss sponged over the top with cling film to create a vintage look.

The decals are super easy to use.  Roughly cut out the decal you want, soak in water for 10-15 seconds, slide off and place on your nail.  While they're wet they're easy to move around, so you don't have to worry about getting it wrong!  Oh, and don't forget to peel off the protective plastic sheet before soaking them...honestly, you wouldn't believe how many times I forgot.  that's why there's a few extra bits if decal on my index finger.

Review-Born-Pretty-Store-nautical-nail-water-decals-Barry-M

For this Whites look I used Barry M Matt White and Gold Foil.  The little chains are also decals :)  There's a few chain and rope type designs in there that are great for tips!

Review-Born-Pretty-Store-nautical-nail-water-decals-Nails-Inc-OPI

Finally, I played with my new Nails Inc Southwark and used my old reliable (and a little bit stinky) OPI Flick Chick Cherry for this more traditional nautical manicure :)  All the white bits were done with the Barry M Nail Art Pen - I was feeling too lazy to get out the dotting tools and striping tape.

You can see these decals here.  They're $3.99 (£2.63) - a right bargain for how many manicures you'll get out of this sheet.

I can see from the stats that Born Pretty Store give me access to that over 75% of people who make a purchase from following one of my links doesn't use my discount code!  Nooo!  If you're going to make a purchase, save yourself some money ladies!  You can use my code LKL91 for 10% off any purchases from Born Pretty Store, at any time.  So go on, treat yourself :)  I think I'm going to be putting in an order for some of those ice cream colour nail polishes - how fabulous do they look??


Just wait until you see the next lot of water decals I've got from Born Pretty Store to show you...oh my giddy aunt...  (If you want a sneak preview, pop on over to Instagram @polishedart).

Tuesday 21 May 2013

Textured Nail Art #2

Helloooo!

Here are the last two ideas I have for you for things to do with your textured polish :) (other than throw them in the bin where they belong :p ).

If you want to have a look at the half moons and stripey manicure I did in part 1, you can check out the post here.

Gradient

My idea was to have a gradient of creme and textured polish of the same shade.  Barry M do some shades that are pretty similar to their textured polish, but there is actually a bit of a difference.  I think it still works though.

Textured-nail-art-Barry-M-Ridley-Road

I used Barry M Mint Green and Ridley Road.  Sorry about the hideous break on my thumb - sometimes I wish I could give up my square nails because the corners are always snapping!  Anyhoo, to ensure good coverage I painted on Ridley Road to half of my nail.  When that was dry, I sponged on a little more just to blend the two colours together.  Sponging worked really well with the textured polish actually - it kind of just picks up the texture-y bit which is quite cool.

Accent Nail

Ahh, our old friend the ring accent.  Probably the simplest way to jazz up your textured mani a little.

Textured-nail-art-Barry-M-Kingsland-Road

I used Barry M Matt White and Kingsland Road.  I used a dotting tool to paint on my heart - I'd recommend using a brush to show up more of that texture.

Have you had a go at any nail art with textured polishes?  If so, I'd love to see them!  Leave your links in the comments :)

Untried Challenge Day 6: Cool

Right then, let's see if I can catch up with this challenge before it finishes!

Here's a quick reminder of the challenge prompts:


For my cool manicure, I chose NYC East Village and Lights Camera Glitter.

Untried-Challenge-Day-6-Cool-with-NYC-East-Village-Lights-Camera-Glitter

It doesn't show very well, but I did a reverse glitter gradient on all my nails, except my ring finger which I fully covered in glitter and then blinged up with some rhinestones.  The glitter's probably a little to sparse for this, but it is very pretty.  I love the little purpley hexagons.

East Village on the other hand is useless.  That's gone straight in the 'get rid of' pile.  This was four coats (albeit 2 of them applied by candle light during a power cut) and it still wasn't opaque.  And this sort of finish just isn't for me.

I'm not doing too well at getting through the untried stash really.  Since starting the challenge I've bought 13 new polishes...I think I sort of missed the point.  They are all pretty though, and they were all bargains - how could i refuse?  I can't wait for my first ever Illamasquas to arrive!  Come on Mr Postman!

Don't forget to catch up with all the other ladies:


Jonochi at Just Add Polish
Masha at Lost In Lacquer
Raine at Lacquer Lily
Amy at Fancy Side
Lizajane at Organic Neglect
Blueberry Pie at Blueberry Nails
Kristina at Lacquer Fetish
Missy at Gnarly Gnails
Uni at Acetone FIles
Erica at Coat of Mani Colors 

Sunday 19 May 2013

Textured Nail Art #1

I'm back!

Well, sort of.  We'll see how long it lasts...  I've got my old laptop and it struggles with most things.  But fair dos to it, it's 7 years old and it's working far better than my year and a half old laptop at the moment...

So anyhoo, I'm making my return with a post about textured nail art.  When textured polishes were first released, there was a flurry of excitement, but also lots of people asking 'but how can they be used in nail art??'.  I was going to put together this post way back when, when it would have beena little more relevant, but I was contacted by a company and asked to review some of their textured products, so I thought I'd hold off and wait for those to arrive.  Unfortunately, after I replied saying I'd love to do the review, and that it fitted perfectly with a series of posts I was planning, I never heard from them again!  Oh well...  so that's my excuse for why this is so late :p

I shall begin by saying this: I hate textured nail polish.  I hated all the swatches I saw, but I was overcome with excitement one day in Superdrug (you know how it is) and ended up buying two of the Barry M ones.  I hated them even more on the nail.  My fiance thought they looked cool, but he's a man so what does he know?

Anyhoo, here are a couple of suggestions for nail art with your textured polishes!

Half Moons

A classic manicure, why not give it a textured twist?

Textured-half-moon-nail-art-Barry-M-Kingsland-Road

I normally just freehand on my half moons, but for this I used the hole reinforcer technique, as I didn't know how painting over the texture would go!  This is why my half moons are so big...need more practice!

I used Barry M Gold Foil with Barry M Kingsland Road over the top.

Stripes

Sit down and have a good old session with your striping tape.  Adding a textured polish in as one of your stripe colours adds a little extra interest to the manicure.

Textured-stripes-nail-art-Barry-M-Ridley-Road

Here I used MUA All Nude for my base, and Barry M Peach Melba, Gold Foil and Ridley Road.

A little tip: I think you'd be better off doing all your normal polish stripes first, and then topcoating over that, and doing your textured stripe of top of that.  Otherwise it ends up quite bumpy all over like mine!

I hope this has given you some inspiration for other things you can do with your textured polishes!  I have two more designs that I'll be showing you tomorrow :)

Monday 6 May 2013

Blue Screen of Death

Hello ladies :)

I hope all of you in the UK are enjoying your day off, and what lovely weather for it!

This is just a quick post to say that I probably won't be able to post for a couple of weeks. I installed updates on my laptop this morning and now it's dead. I try to turn it on, I get the blue screen of death. Try to start in safe mode - blue screen of death. Try to debug - blue screen of death. So yeah, pretty much dead...

I'm visiting my parents this weekend, so I'll pick up my old laptop and see if that still works, do potentially I'll be back up and running by next week, otherwise it'll be when my fiancé gets back in two and a half weeks and I can steal his laptop.

In the mean time, keep an eye in my Facebook page (link on the sidebar) and I'll make sure to post some dodgy phone pics on there :)

Sunday 5 May 2013

Ninja Polish Divinity

As promised, here are some pictures of Ninja Polish Divinity for you to drool over.  I've grouped them into fours to create the illusion that I'm not totally spamming you with 16 photos...

I used three coats of Divinity (although 2 would have been fine) plus top coat.

Ninja-Polish-Divinity
Top: lightbox, Bottom: natural light
 Where to begin...  It's beautiful (if you couldn't already tell I think that from all the photos...).  On the first coat it's a very warm purple tone, leaning a little magenta, then when you add the second coat all the other colours become more prominent.

It's mostly orange and purple, but there are tonnes of other colours in there as well.  The orange ranges from a light gold through to a deep burnt orange, and there's lots of green on the edges and a bit of blue thrown in as well.  These were very distracting nails to wear to work...

Ninja-Polish-Divinity
Top: natural light, Bottom: Artificial light
 As you can see, the difference in different lights is incredible.  I'd forgive you for thinking that I'm having you on and that these are actually different polishes (but I promise you they're not!).

In natural light, Divinity is everything I thought Max Factor Fantasy Fire was going to be (biggest let down ever).  In artificial light, that shimmer is just AMAZING.

Ninja-Polish-Divinity
Top: artifical light, Bottom Left: natural light, Bottom Right: lightbox
I've included a picture with the flame accent nail, because while I was taking the pictures for that post, this gorgeous turquoisey blue appeared!

So, yeah, my conclusion is that Divinity is pretty darn pretty.  And a multichrome that doesn't need to be layered over black to look amazing, hurrah!

Saturday 4 May 2013

Untried Challenge Day 5: Warm

Right, in with the excuses first.  It's not my fault I'm late posting!  I got home from work yesterday, started cooking my tea, and then my electricity went off.  Until 10:30pm.  Turns out there is VERY little you can do without electricity, so I napped.

Anyway, here's a reminder of the challenge prompts for the Untried Polish Challenge hosted by Jonochi at Just Add Polish.


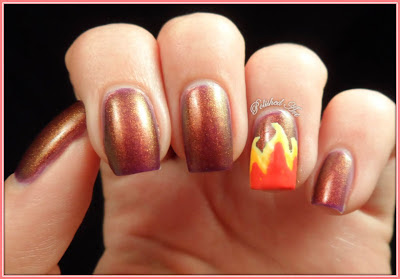
So today's theme is warm.  I instantly picked out Ninja Polish Divinity from my stash, which I was lucky enough to win in a giveaway at Pointless Cafe.

Untried-Challenge-Day-5-Warm-Ninja-Polish-Divinity-Nails-Inc-fire-nail-art


I'm not going to be too cruel, I'll only make you wait a day before showing you more pictures of Divinity.  It's veeeerrryyy pretty.

Anyhoo, as pretty as the polish is, I don't like to wear plain nails, so I added a flame.  Because, you know, flames are warm.  Unfortunately though, I didn't have any flame coloured polishes in my untried pile.  Enter my delivery from Nails Inc (I got a lucky dip) - they very conveniently provided me with a red, orange and yellow.  These are Draycott Place, Westbourne Grove and Notting Hill Carnival.

Don't forget to take a look at everyone else's toasty manicures!


Jonochi at Just Add Polish
Masha at Lost In Lacquer
Raine at Lacquer Lily
Amy at Fancy Side
Lizajane at Organic Neglect
Blueberry Pie at Blueberry Nails
Kristina at Lacquer Fetish
Missy at Gnarly Gnails
Uni at Acetone FIles
Erica at Coat of Mani Colors 


Wednesday 1 May 2013

Untried Challenge: Day 4

When I first signed up for this challenge, Jonchi sent me an email with all the dates and said "I know you can count, but this list helps me!".  Well apparently even with a list I can't keep track.  I was just sitting here thinking 'hmm...I don't think I've posted a challenge manicure for a while...'.  I've even been getting them done ahead of time.  Sigh.

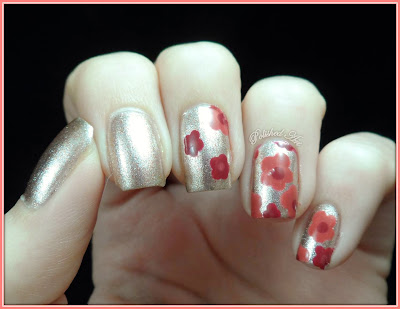
Anyway, here's my neutral manicure!

Untried-Challenge-Day-4-Neutral-polish-OPI-Designer-de-Better-muppets-collection

OPI Designer de Better is the only neutral-ish polish in my untried pile, so that's what I went with!  Very pretty polish, but not the kind of finish I like.  So I added some flowers with Nails Inc Hampstead Heath and a nameless Barry M.

Take a ganders at what all the other lovely ladies posted yesterday:


Jonochi at Just Add Polish
Masha at Lost In Lacquer
Raine at Lacquer Lily
Amy at Fancy Side
Lizajane at Organic Neglect
Blueberry Pie at Blueberry Nails
Kristina at Lacquer Fetish
Missy at Gnarly Gnails
Uni at Acetone FIles
Erica at Coat of Mani Colors